Ensuring that your generator’s low oil sensor is functioning correctly is essential for the safety and reliability of your power supply. In this post, we will walk you through the simple steps to verify the proper operation of the low oil sensor, helping you to prevent potential engine damage and unexpected power interruptions.
Here is the step-by-step list to test the oil sensor on the generator.
- Access the sensor
- Inspect the sensor visually
- Test with a multimeter
- Check the resistance reading
- Manipulate the oil level
- Check the warning light or shutdown mechanism
So, let’s get started and ensure your generator is ready to keep the lights on when you need it most.
How to Test Low Oil Sensor on Generator?
Materials Needed:
- Multimeter (A digital multimeter is more accurate for this type of job.)
- Wrenches (to remove the sensor, if necessary)
- Gloves (for safety)
- Eye protection (for safety)
Steps:
- Access the sensor: Find your generator’s oil sensor. It’s usually located near the bottom of the engine block, where the oil reservoir is. The generator should be off and cool to the touch before you proceed. For safety, disconnect any power sources and remove the spark plug wire to prevent accidental starting.
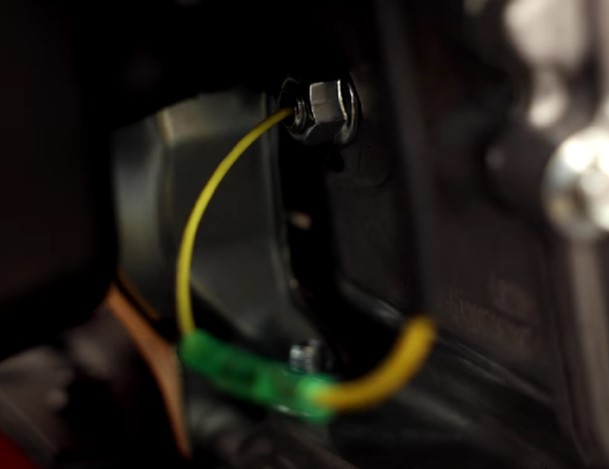
- Inspect the sensor visually: Check the sensor and its wiring for any signs of damage, such as frayed wires, cracks, or corrosion. If any damage is present, this may cause your issues, and you should consider replacing the sensor or wiring.
- Test with a multimeter: Set your multimeter to test resistance (Ohms). If your oil sensor is a two-wire sensor, connect one probe to each sensor’s terminals. If it’s a single wire sensor, connect one search to the sensor’s terminal and the other to a clean ground point on the engine block.
- Check the resistance reading: A functioning sensor should show some resistance. The specific value can vary based on the sensor, but many sensors will show resistance in the range of 10-500 Ohms when the oil level is correct. The sensor may be faulty or disconnected if you see a high resistance (in the megaohms). The sensor may be shorted if you see very low resistance (near zero).
- Manipulate the oil level: For a more thorough test, you could check the sensor’s response to different oil levels. With the generator off and cool, drain some oil (catch it for reuse or proper disposal), then recheck the resistance. The reading should change significantly – if it doesn’t, the sensor may not work correctly. Refill the oil to the correct level when you’re done testing.
- Check the warning light or shutdown mechanism: Finally, if your generator has a warning light or automatic shutdown feature for low oil, you can also test these. With the oil filled to the correct level, start the generator. Suppose the warning light comes on or the generator shuts down despite the adequate oil level. In that case, there may be a problem with the sensor or the associated circuitry.
How to bypass the low oil sensor on a generator?
While bypassing a low oil sensor on a generator is technically possible, it’s generally not recommended. The sensor is a crucial safety feature that protects your engine from severe damage. Running a generator without enough oil can cause overheating and extensive damage that may not be repairable.
However, if you believe the sensor is malfunctioning and causing your generator to not run despite the oil being at an appropriate level, consider temporarily bypassing the sensor to confirm the diagnosis.
Always consult your owner’s manual or a professional mechanic before proceeding.
Here’s how you can temporarily bypass a low oil sensor for diagnostic purposes:
- Safety first: Ensure the generator is turned off and cool to the touch. Disconnect any power sources and remove the spark plug wire to prevent accidental starting.
- Locate the sensor: Find the low oil sensor on your generator. It’s typically located near the engine’s base and the oil reservoir.
- Disconnect the sensor: The sensor will be connected to the generator’s circuit via a wire. Disconnect this wire from the sensor. Some generators may have a plug connecting the sensor to the wire that can be easily unplugged, while others may require you to remove a screw or nut.
- Insulate the wire: Once disconnected, it’s essential to ensure the wire doesn’t come into contact with any other metal parts, as this could cause a short circuit. Use electrical tape to insulate the end of the wire.
Remember, this should only be done as a short-term solution to verify if the sensor is causing the problem. After this, the issue should be fixed appropriately—either by replacing the sensor if it’s indeed faulty or addressing the actual cause of the problem if not.
Operating a generator with a bypassed or disabled oil sensor for a long time can cause significant damage to the engine if it runs low on oil. Always fix the issue promptly and correctly, and never run the generator if you suspect it’s low on oil.
Related Post:
- Onan 4000 Generator Oil Type (Troubleshooting)
- Best Engine Oil for Honda Generator
- Best Engine Oil for Predator Generator
- How to Fix Low Oil Pressure in a Generator?
FAQ on Testing Low Oil Sensor on Generator
Briggs and Stratton low oil sensor location
The location of the low oil sensor in a Briggs and Stratton engine depends on the model of the machine. However, generally, it can be found at the base of the engine, close to the oil reservoir or the oil fill/drain plug.
Here are the steps to locate it:
- Identify the oil reservoir: The oil reservoir is usually located at the bottom of the engine. You can identify it by looking for a cap with an oil can symbol or the word “OIL” written on it.
- Look for the sensor: The low oil sensor is typically a tiny cylindrical or square component with a wire or two coming out. It may be screwed into the engine block or attached with a bracket.
Remember to ensure the engine is off and cool before you investigate to avoid injuries. If you’re having trouble locating the sensor, consult your engine or equipment manual or contact Briggs and Stratton or a qualified mechanic.

How do I know if my generator is low on oil?
Generators often come equipped with various features indicating they’re low on oil. Depending on the specific model, here’s how you can tell:
- Low Oil Warning Light or Indicator: Many generators come equipped with a warning light or indicator on the control panel. If this lights up, the generator is low on oil.
- Automatic Shutdown: More advanced models have an automatic shutdown feature for when oil levels become dangerously low. If your generator keeps shutting off after only a few minutes of operation, this could be the cause.
- Physical Oil Check: Regardless of whether your generator has these features, you should periodically check the oil level manually. This is typically done by unscrewing the oil fill cap/dipstick, wiping it clean, then reinserting it without screwing it back in. When you pull it out again, you can check where the oil level reaches against the markings on the dipstick. If it’s below the minimum mark, add more oil.
- Unusual Noises or Performance Issues: Low oil can cause various mechanical problems, leading to abnormal noises like clanking or knocking or issues like smoke from the exhaust or overheating.
Conclusion
If unsure how to check the oil level or interpret the generator’s indicators, consult the owner’s manual or contact the manufacturer for guidance. Maintaining regular oil checks to ensure your generator’s longevity and optimal performance are always better.
`
Recent Posts
Yes, synthetic oil can generally be used in generators. It offers superior lubrication, improved resistance to temperature variations, and longevity compared to conventional oil, which can enhance...
In today's digital age, our dependency on computers and other electronic devices is undeniable. But what happens when a power outage occurs? This is where generators come in. However, is it safe to...