Generators are essential for power during blackouts, outdoor activities, or remote locations. Keeping your generator clean ensures its long lifespan and efficient operation. Before starting the cleaning process, always remember to prioritize your safety.
The cleaning process will involve handling fuel and electrical parts, which can be dangerous if not handled properly. You’ll need a few essential tools and materials, such as a soft brush, a clean cloth, soapy water, and possibly a new air filter or spark plug, depending on the condition of your generator.
importance of cleaning the generator
Keeping your generator clean and well-maintained is of significant importance for several reasons:
- Performance: A clean generator operates more efficiently than a neglected one. The dust, dirt, and grime buildup can clog air filters and cooling vents and affect various other parts, leading to diminished performance over time.
- Longevity: Regular cleaning and maintenance extend the life of the generator. As you clean, you’ll likely notice potential issues like loose wires or damaged parts that can be addressed promptly before they become more significant, expensive problems.
- Safety: A dirty generator could pose a safety hazard. Leaking fuel from a poorly maintained generator could lead to fire risks. Also, overheating due to clogged air filters or cooling vents could result in damages or even accidents.
- Cost Savings: Regular cleaning can save you money in the long run. It’s cheaper to clean or replace an air filter or spark plug now than to replace an entire generator later because the engine was damaged due to poor maintenance.
- Reliability: When you need a generator, you often need it to work reliably (e.g., during a power outage). Regular cleaning ensures the generator will work optimally when needed.
- Resale Value: If you ever decide to sell your generator, having a well-maintained, clean generator can significantly increase its value.
Remember, a generator is an investment; like any investment, it must be taken care of. Regular cleaning is a straightforward way to ensure your generator operates efficiently, safely, and reliably whenever required.

Step-by-step Guide on Cleaning the Generator
Pre-cleaning Steps
Before cleaning:
- Disconnect the generator from any power source and turn it off.
- Ensure it’s cool to touch to avoid any accidents.
- Remove the generator cover, if applicable, according to the manufacturer’s instructions.
Cleaning the Generator Exterior
Dust off the exterior with a soft brush to remove loose dirt or debris. Clean the generator’s exterior surface gently using a cloth soaked in soapy water. Finally, dry it with a clean cloth to prevent rusting.
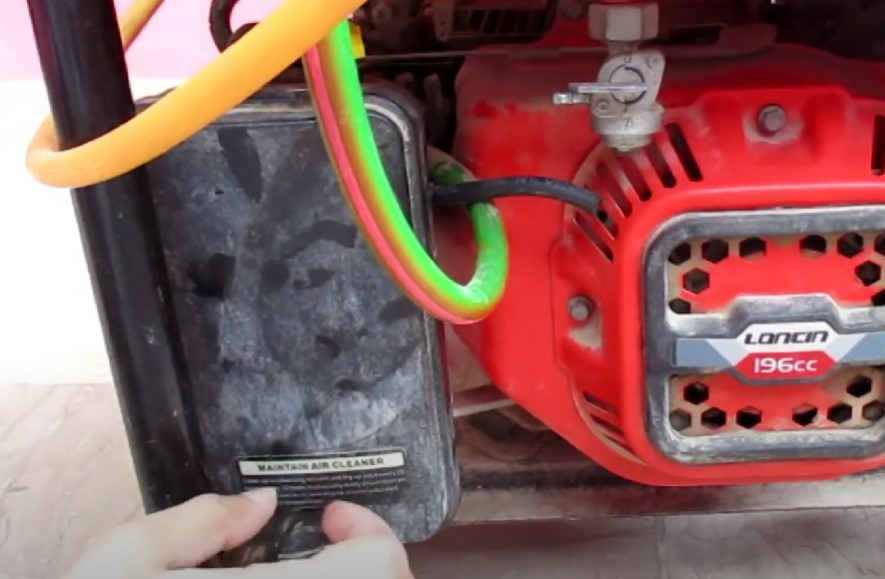
Cleaning the Air Filter
The air filter, usually located within the generator’s housing, should be cleaned or replaced regularly. Remove the filter carefully and clean it using soapy water. If it’s too dirty or damaged, consider replacing it with a new one.
Cleaning the Fuel System
The fuel system includes the fuel tank and carburetor. Empty the fuel tank and clean it using a fuel tank cleaner following the product’s instructions. Cleaning the carburetor can be tricky; seek professional help if you need more confidence. Replace the fuel filter as per the manufacturer’s instructions.
Cleaning the Spark Plugs
The spark plugs can be found in the engine compartment. Remove them carefully using a spark plug socket. Clean any deposits with a wire brush and inspect them for wear and tear. If they’re worn out, consider replacing them.
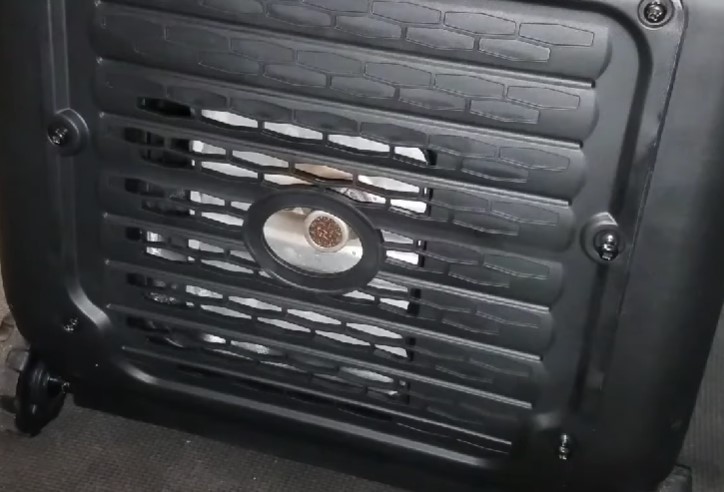
Cleaning the Cooling System
A clean cooling system helps to keep the generator’s temperature down during operation. Check the cooling fins for any debris and clean them using a soft brush. If the generator is water-cooled, check the coolant level and replace it if necessary.
Reassembly and Reconnection
After cleaning all parts, reassemble the generator. Make sure everything is fitted correctly before reconnecting and testing the generator.
Related Post
- Generac Generator Turns on Randomly (Cause & Solution)
- How to Keep Generator from Freezing? (6 Proven Tips)
- Where To Store Generator In Travel Trailer?
How Often Should We Clean the Generator?
The frequency of cleaning a generator can depend on several factors, including how often the generator is used, the environment in which it operates, and the manufacturer’s guidelines. However, here are some general guidelines:
- After Every Use: If you use your generator frequently, a basic external cleaning after every use is recommended. This involves dusting off the exterior and checking for any signs of wear and tear or damage.
- Air Filter Cleaning/Replacement: For generators used frequently, the air filter should be checked every month and cleaned or replaced as necessary. If your generator is used less regularly, checking and cleaning the air filter every three months is typically sufficient.
- Spark Plugs and Fuel System: The spark plugs and fuel system should generally be inspected and cleaned every 100 hours of operation or at least once a year if it’s not used frequently.
- Comprehensive Cleaning and Maintenance: A thorough cleaning and maintenance check should be carried out at least once or twice a year. This involves cleaning the exterior, air filter, spark plugs, fuel system, and cooling system and checking all parts for any signs of damage or wear.
- Professional Service: Depending on the complexity of your generator, it might be worthwhile to have it professionally serviced once a year. A professional service can check the generator’s engine, alternator, and other intricate parts that might be challenging to access or clean.
Generator Maintenance Tips
Proper generator maintenance is essential to ensure that it performs reliably and efficiently when you need it most. Here are some top tips to keep your generator in optimal shape:
- Regular Cleaning: Keep the generator clean, both inside and out. A clean generator performs better and is easier to inspect for potential issues.
- Check Fluid Levels: Regularly check and maintain the recommended fluid levels, including engine oil and coolant. Change the oil and replace the oil filter as recommended by the manufacturer.
- Air Filter Maintenance: Regularly check, clean, and replace the air filter. A clogged air filter can lead to inefficient operation and may cause the engine to overwork.
- Fuel System Care: Always use fresh fuel and try to prevent the fuel from sitting in the tank for long periods. Stale fuel can cause gumming and varnish in the fuel system, leading to issues.
- Spark Plug Maintenance: Clean the spark plug and regularly check for wear or damage. Replace it as necessary.
- Battery Maintenance: If your generator has a battery, keep it charged and check regularly for corrosion. A non-functional battery is a common cause of generator starting problems.
- Regular Inspection: Inspect your generator for any loose connections, damaged wires, or worn-out parts. Early detection of issues can prevent more severe problems down the line.
- Professional Service: Even with regular self-maintenance, have your generator serviced by professionals annually. They can check the generator’s engine, alternator, and other intricate parts that might be challenging to access or clean.
- Proper Storage: Store the generator in a clean, dry place when not in use. If it will be stored for a long time, consider using a fuel stabilizer to prevent it from degrading.
- Follow Manufacturer’s Guidelines: Refer to the manufacturer’s manual for specific maintenance procedures and schedules. Adhering to the manufacturer’s guidelines will help prolong the generator’s life.
With regular care and maintenance, your generator will be ready to provide power whenever needed.
FAQ on cleaning Generator
How to Clean Generator’s Air Filter?
Cleaning a generator’s air filter is a vital part of regular maintenance. Here is a step-by-step guide to cleaning your generator’s air filter:
- Safety First: Before starting, ensure the generator is turned off, disconnected from any power source, and has had sufficient time to cool down.
- Locate the Air Filter: The air filter is usually in the generator’s housing. Refer to your user manual for its exact location.
- Remove the Air Filter: Depending on your model, you may need to unscrew or unclip a cover to access the air filter. Be careful not to lose any screws or clips.
- Inspect the Air Filter: Once removed, inspect the filter for damage. Replace it if it’s torn or excessively dirty. If it’s only moderately cloudy, you can clean it.
- Clean the Air Filter: If it’s a foam filter, wash it with a mild detergent and warm water. Use a soft brush to gently remove dust and debris if it’s a paper filter. Never clean a paper filter, as this can cause damage.
- Dry the Air Filter: Allow the filter to air dry completely. This is important as a damp filter can allow water into the engine, causing damage.
- Reinstall the Air Filter: Once the filter is completely dry, place it back into the housing, replace the cover, and secure any screws or clips.
- Test the Generator: After reassembling, start the generator to ensure it runs correctly. If it’s still not working correctly, you may need professional help.
Remember, a clean air filter ensures that your generator runs efficiently and reduces wear on the engine. Always refer to the user manual for specific instructions for your generator model.
How to clean the generator radiator?
Cleaning your generator’s radiator is essential in maintaining its cooling system. Here’s a step-by-step guide on how to do it:
- Safety First: Ensure the generator is turned off, disconnected from any power source, and fully cooled down before you begin cleaning.
- Access the Radiator: Depending on your generator model, you might need to remove certain parts or covers to gain access to the radiator. Refer to your generator’s manual to understand how to do this safely.
- Inspect the Radiator: Before starting the cleaning process, inspect the radiator for any visible damage, such as leaks or bent cooling fins.
- Remove Loose Debris: Use a soft brush or compressed air to remove any loose dust or debris from the radiator. If using compressed air, direct the airflow from the engine side outwards to avoid pushing debris further into the radiator.
- Wash the Radiator: Use a low-pressure hose to spray the radiator from the engine side outwards. This should remove any remaining dirt or debris. Never use a high-pressure hose, as it could damage the radiator fins. Avoid spraying electrical components.
- Dry the Radiator: Allow the radiator to air dry completely before reassembling. This will prevent any water-induced issues, like rust.
- Inspect and Straighten Fins: Check the cooling fins on the radiator. If bent, carefully straighten them with a radiator comb or needle-nose pliers. Be gentle, as these fins can be delicate.
- Reassemble the Generator: Once the radiator is dry and clean, reassemble any parts or covers you removed.
- Test the Generator: After everything is back in place, run the generator to ensure it operates properly.
Always refer to the user manual for specific instructions tailored to your generator model. If the radiator appears to be severely clogged or damaged, consider seeking professional help.
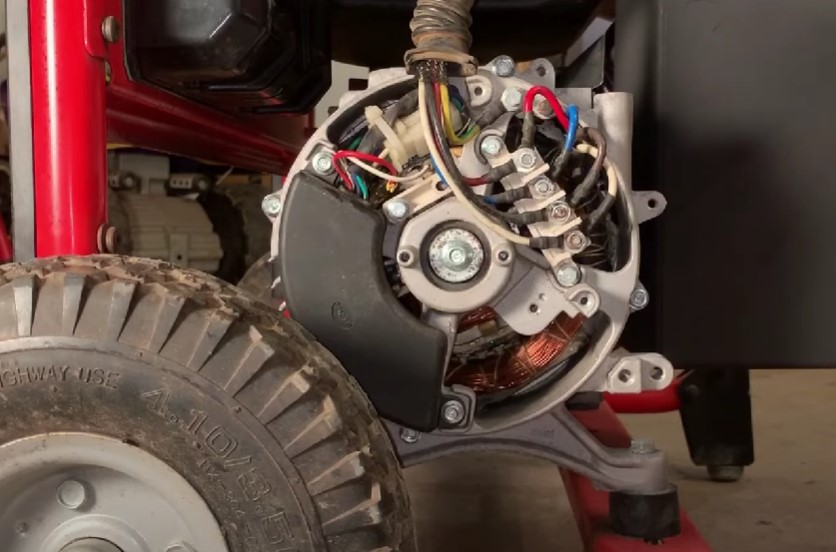
How to clean generator brushes?
Generator brushes are a crucial component of your generator’s functionality, and keeping them clean can improve their performance and longevity. Here’s a step-by-step guide on how to clean generator brushes:
- Safety First: Ensure the generator is turned off, disconnected from any power source, and has had sufficient time to cool down.
- Access the Generator Brushes: Depending on your generator model, you may need to remove a cover or part of the casing to reach the brushes. Consult your generator’s manual to understand how to do this properly and safely.
- Inspect the Brushes: Check the brushes for any apparent signs of wear or damage. They must be replaced rather than cleaned if worn down significantly or damaged.
- Remove the Brushes: Carefully remove the brushes from their holders. This is often achieved by unscrewing a retaining bolt or clip. Be careful to keep all small parts.
- Clean the Brushes: Use a soft cloth or brush to clean any dirt or carbon deposits off the brushes gently. Be careful not to damage the bushes in the process. For stubborn grime, you can use a bit of rubbing alcohol, but avoid using any harsh chemicals that could damage the brushes.
- Clean the Brush Holders: With the brushes removed, clean the brush holders using the same method. This prevents any loose dirt from contaminating the brushes again when replaced.
- Dry Thoroughly: If you use any alcohol or cleaning solutions, ensure everything is thoroughly dry before reassembling.
- Reinstall the Brushes: Once everything is clean and dry, carefully reinstall the brushes into their holders and secure them with the retaining bolts or clips.
- Reassemble the Generator: Replace any covers or parts of the casing that you removed to access the brushes.
- Test the Generator: After everything is reassembled, start the generator to make sure it’s operating correctly.
Always refer to the user manual for specific instructions tailored to your generator model. If you need more time cleaning the brushes, consider seeking professional help.
How to clean generator spark arrestor?
The spark arrestor on your generator serves to prevent any fiery particles from exiting the exhaust system, reducing the risk of accidental fires. Keeping this component clean is an essential part of generator maintenance. Here’s a step-by-step guide:
- Safety First: Before starting, make sure the generator is turned off, disconnected from any power source, and has had ample time to cool down.
- Locate the Spark Arrestor: This is usually found on the muffler or exhaust outlet of the generator. Consult your user manual for its exact location.
- Remove the Spark Arrestor: Using the appropriate tools, unscrew or unclip the spark arrestor from its position. Be careful not to lose any screws or clips.
- Inspect the Spark Arrestor: Check the spark arrestor for any visible signs of damage. If it’s extensively damaged, it might need to be replaced.
- Clean the Spark Arrestor: Use a wire brush to gently scrub off any carbon deposits from the spark arrestor mesh.
- Further Cleaning: If the spark arrestor is still dirty, soak it in warm water and a mild detergent. Scrub it again with the wire brush after soaking, then rinse it.
- Dry the Spark Arrestor: Allow the spark arrestor to air dry completely. This is important as a damp spark arrestor can cause the generator to perform poorly.
- Reinstall the Spark Arrestor: Once it’s scorched, secure the spark arrestor back onto the exhaust outlet of the generator.
- Test the Generator: After reassembling, run the generator to ensure it’s operating properly.
How to clean generator windings?
Cleaning generator windings can be complicated and is not typically performed as part of regular maintenance by a generator owner. If not done correctly, it could lead to irreparable damage to the generator. In general, seeking professional help for such a task is advised.
However, if you’re an experienced technician with adequate knowledge and have the right tools, follow these steps:
- Safety First: Disconnect the generator from any power sources and ensure it is completely turned off and has cooled down sufficiently.
- Access the Generator Windings: Open the generator housing or casing to access the windings. This will require technical know-how and familiarity with your specific generator model.
- Inspect the Windings: Check the windings for signs of dirt, grease, dust, or carbon deposits. Also, inspect for any signs of wear, damage, or overheating.
- Clean the Windings: Use a soft brush to remove any loose dirt or dust from the windings gently. For more stubborn dirt or grease, use a lint-free cloth lightly dampened with a mild electrical cleaning solvent, which can be found at specialist electrical supply stores. Make sure the solvent is suitable for use with electrical equipment.
- Dry the Windings: Allow the windings to air dry thoroughly after cleaning. You can use a dry, clean, lint-free cloth to help speed up the process. Ensure there are no traces of the solvent left on the windings.
- Inspect Again: After drying, inspect the windings once again. Ensure all dirt and grease have been removed and there is no damage or loose connections.
- Reassemble the Generator: Carefully reassemble the generator once you’re satisfied that the windings are clean and dry.
- Test the Generator: Turn on the generator to ensure it operates properly.
Conclusion
Remember, this is a complex task that involves working with the generator’s electrical components. If you need more clarification or the generator isn’t working correctly after cleaning the windings, seek professional help immediately. Hope, you have got at least elementary knowledge from this article.
Recent Posts
Yes, synthetic oil can generally be used in generators. It offers superior lubrication, improved resistance to temperature variations, and longevity compared to conventional oil, which can enhance...
In today's digital age, our dependency on computers and other electronic devices is undeniable. But what happens when a power outage occurs? This is where generators come in. However, is it safe to...